

Orientation
This orientation page provides information that will be helpful in completing the tutorials.
Click on Technology Troubleshooting, if you have questions about your network or basic computer use such as making adjustments in your operating system or web browser.
A Text-Only Orientation Page is also available.
Course Organization
Let's learn to use the Shaping Outcomes course. Each module page is divided into four areas. Click on each area on the menu below or in the graphic below to learn more.
- Resource Tabs - The Resource Tabs across the top of each page provide links to Home, Orientation, Logic Model, Cases, Glossary, and Credits.
- Orientation Sidebar - The Orientation Sidebar on the left helps you identify where you are in the modules.
- Content Area - The main body of the module is called the Content Area and contains interactive learning materials.
- Navigation Bar - The numbered Navigation Bar across the bottom of the Content Area directs users to pages and examples in the module. You can also use the "next" button at the top of the content area or your back button at the top of your screen.
Resource Tabs
The Resource Tabs across the top of each page provide links to Orientation, Cases, Resources, Model, Glossary, and Home pages. The current page will be indicated in black. Pages that you've visited will change from gray to green.
![]()
Orientation. The Orientation Tab provides help in troubleshooting basic technology issues and problems. It also provides an overview of the four areas found on each module page and how to navigate through the learning materials.
Logic Model. The Logic Model Tab contains a visual and explanation of the Logic Model discussed in the modules.
Cases. The Cases Tab contains links to complete library and museum case information. These cases are displayed in the PDF format.
Glossary. The Glossary Tab details key words and definitions associated with the modules.
Home. The Home Tab takes users back to the main index page for the course.
Orientation Sidebar
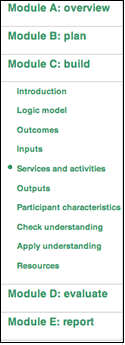 The Orientation Sidebar on the left side of the screen helps you identify where you are in the modules. The example screen on the left will be used to identify the elements of this sidebar.
sidebar
A quick reference to the five modules and pages within the current module is provided. Users can click on these items to move between modules and pages within modules. Notice that an expanded menu is provided for the current module. In the example, the Module C: build module is expanded.
Not all pages are listed for each module. Instead, only the main sections are indicated. For example, there are three pages within the Services and activities section of Module C: build. The current module section is indicated with a green dot.
Content Area
The main body of the module is called the Content Area and contains interactive learning materials.
Each module begins with an overview page and a series of content pages. The module ends with Check understanding, Apply understanding, and Resources pages.
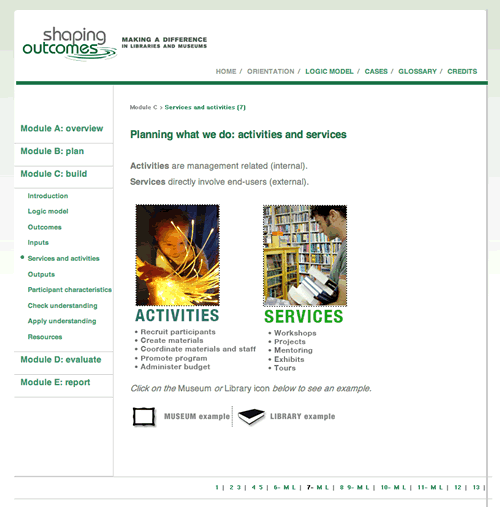
Pagination. The text in the page Title Bar across the top of the screen and the Content Page Orientation across the top of the Content Area indicates the current module letter (A through E) along with the section and current page number. In this case, the user is in the third module (C), Build, on page number 7 of a total 13 pages in the module.
Title Bar -
Content Page Orientation -
In some cases, users are taken to separate Museum or Library pages. These specialty pages are identified as M for museum and L for library. For example, Screen 7-M is a museum example and Screen 7-L is a library example.
Heading and Information. Each page contains a description heading introducing the topic of the page. Next, new concepts are explained and relevant examples are displayed.
Directions. Many pages contain an active participation element asking users to think and take action. Instructions for these activities are found in italics.
Generally, users are asked to either click on or move their cursor over text or a visual.
Navigation. There are five ways that learners move to a content page in the module.
First, users may be directed to click on the Museum or Library button in the content area.
![]()
In the Check understanding section, users may also be instructed to use the case study buttons to open PDF documents to examine.
![]()
![]()
Second, learners may wish to explore the Coach or Dig Deeper options.
![]() The Coach icon button will pop-up a special window. This button is used when the user is seeking help or guidance. Information is available to support student learning such as background information, definitions, motivation, reality checks, suggested approaches, and other types of guidance.
The Coach icon button will pop-up a special window. This button is used when the user is seeking help or guidance. Information is available to support student learning such as background information, definitions, motivation, reality checks, suggested approaches, and other types of guidance.
![]() The Dig Deeper icon button will pop-up a special window. This button is used to increase the depth of understanding through additional examples, expanded descriptions, and advanced content.
The Dig Deeper icon button will pop-up a special window. This button is used to increase the depth of understanding through additional examples, expanded descriptions, and advanced content.
Third, users may choose the next page number from the Navigation Bar at the bottom of the screen.
Finally, users may move between content pages using the Orientation Sidebar on the left side of the screen. At the end of the module, the Orientation Sidebar should be used to go to the next module in the course. You can also use the "next" button at the top of the content area or your back button at the top of your screen.
Navigation Bar
The Navigation Bar across the bottom of the Content Area directs users to pages and examples related in the module. The current page is indicated with a black number. Other pages will turn from gray to green once they've been viewed. In some cases, separate Museum and Library example pages are available. In this case, the numbered page contains a dash followed by an M to represent the Museum example page and L to represent the Library example page.
![]()
Troubleshooting Tips
This section provides the answers to Frequently Asked Questions about the technology related to using these tutorials. Click on the questions for possible solutions.
- Where do I begin?
- How much time will it take to complete modules?
- What is the recommended hardware and software configuration for this course?
- What if some of the the activity buttons or "roll-overs" don't work? What's javascript?
- What if I get lost in the modules? How can I mark my place?
- What if I'm having trouble with my web browser? Where can I find other browsers to try?
- What do the words mouse, cursor, point, click, roll-over, and pop-up mean?
- How do I change the size of the "screen" so that the text and photographs are larger or smaller? What about the screen colors?
- How do I change the size of the fonts in my web browser?
- What if the Coach and Dig Deeper buttons don't work? What if it's says that pop-ups are blocked?
- What if the Museum Example and Library Example buttons or PDF files don't work?
- How do I open a second web browser window if I want to see the modules and my discussion forums at the same time?
- How do I expand the web browser window?
- Is a text-only version of the modules available?
Answers to Frequently Asked Questions
- Begin at the Overview module and work your way through each page on each module. Use the Course home page for a list of modules.
How much time will it take to complete modules?
- The amount of time you spend on each module depends on your needs and interests. Each module take approximately 30-60 minutes, excluding the time for the Apply Your Understanding activity.
What is the recommended hardware and software configuration for this course?
- Use the following guidelines. Click the bulleted topics to learn how to change configurations on your computer.
- Operating System: Windows XP or newer; Mac OSX or newer
- Screen Display (Monitor Resolution): 1024x768 optimal; 800x600 acceptable
- Color: 16-bit (thousands) color or higher bit depth
- Web Browser: Firefox, Internet Explorer v.5.0 or up; Netscape Communicator v.4.6 or up
- Javascript: Set to enable
- Pop-ups: Set to allow
What if some of the the activity buttons or "roll-overs" don't work? What's javascript?
- If you have a slow Internet connection it may take a while for some pages to load. Please be patient. Wait until the status bar at the bottom of your web browser indicates that it's done loading.
- If it looks like all the images on a page didn't get loaded, try clicking the REFRESH or RELOAD button. If you don't have buttons like this in your web browser, try the View menu.
- If you get an error message containing the word "javascript", your web browser may not have javascript enabled.
Javascript is the program that creates the interactivity on your web page.
- To enable javascript in Firefox for Windows, pull down the Tools menu, choose Options, click Web Features, check Enable JavaScript. Click OK.
- To enable javascript in Firefox for the Mac, pull down the Firefox menu, choose Preferences, click Web Features, check Enable JavaScript. Click OK.
- To enable java in Internet Explorer for Windows, pull down the Tools menu, choose Internet Options, click Advanced, check Java. Click OK.
- To enable javascript in Internet Explorer for the Mac, pull down the Explorer menu, choose Preferences, click Java, check Enable Java. Click OK.
- To enable java in Netscape, pull down the Netscape menu, choose Preferences, select Advanced, check Enable Java. Click OK.
What if I get lost in the modules? How can I mark my place?
- The screen numbers for each page are located on the Orientation Sidebar. The easiest way to keep track of your location is by using these screen numbers.
- If you want to physically mark your place, consider using a bookmark or favorite in your web browser:
- In Internet Explorer, choose Favorites from the menu, then Add to Favorites. Click OK if any dialog boxes appear. To return to the module page, go to Favorites from the Menu, and then choose the name of the page. It should be towards the bottom of the list.
- In Firefox, choose Bookmarks from the menu, then Bookmark This Page. To return to the tutorial, go to Bookmarks from the Menu, and then choose the name of the page from the list.
- In Netscape, choose Bookmarks from the menu, then Bookmark This Page. To return to the tutorial, go to Bookmarks from the Menu, and then choose the name of the page from the list.
What if I'm having trouble with my web browser? Where can I find other browsers to try?
- If you're using an older version of a web browser, it might help to upgrade. A different browser may also help with speed. Use the following links for updates to popular web browsers:
What do the words mouse, cursor, point, click, roll-over, and pop-up mean?
- Mouse - a device used to manipulate objects on the computer screen. Today, many people also use a track pad to serve the same purpose.
- Cursor - the icon on the screen that matches the movement of your mouse or your finger on your track pad. The cursor icon will change from an "I" bar to a "finger" or other image depending on the needs of the web page.
- Point - move your mouse or finger on your track pad until the cursor on the screen is directed to a designated area.
- Click - tap the button on your mouse or the button/bar near your track pad.
- Roll-over - move the cursor over an object on the screen; it's not necessary to click.
- Pop-up - a window or other box that appears on the screen in front of the current window.
How do I change the size of the screen display so that the text and photographs are larger or smaller? What about the colors?
- To change the display in Windows XP , press the Start button, choose Control Panel, choose Appearance and Themes, choose Change the screen resolution.
- To change the screen resolution, move the slide bar to Less or More depending on your preference.
- To change the screen colors, select from options under the Color quality pull-down menu.
- To change the display in Mac OSX , select System Preferences from your Dock, choose Display.
- To change the screen resolution, choose from the slide bar menu.
- To change the screen colors, select from options under the Colors pull-down menu.
How do I change the size of the fonts in my web browser?
- Most web browsers allow users to enlarge or reduce the size of fonts proportionally. Because of screen formatting issues and the large number of images, this will have only a limited impact in these tutorials. If you want to make things larger, change your screen resolution.
- To adjust font size in Internet Explorer for Windows, pull down the View menu, select Text Size, choose largest, large, medium (default), smaller, or smallest.
- To adjust font size in Internet Explorer for Mac, pull down the View menu, select Text Zoom, choose a percentage (100% is default).
- To adjust font size in Firefox, pull down the View menu, select Text Size, choose increase, decrease, or normal.
- To adjust font size in Netscape, pull down the View menu, select Text Zoom, choose larger, smaller, or percentage (100% is default).
What if the Coach and Dig Deeper buttons don't work? What if it's says that pop-ups are blocked?
- The Coach and Dig Deeper buttons bring up a separate window. First, be sure that the window isn't just hidden. Look under the Window menu of your web browser. If that doesn't work, it may be that you have blocked pop-up windows.
- To enable pop-ups in Internet Explorer for Windows, pull down the Tools menu, choose Internet Options, click Privacy, uncheck Block Pop-ups. Click OK.
- To enable pop-ups in Firefox for Windows, pull down the Tools menu, choose Options, click Web Features, uncheck Block Pop-up Windows. Click OK.
- To enable pop-ups in Firefox for the Mac, pull down the Firefox menu, choose Preferences, click Web Features, uncheck Block Pop-up Windows. Click OK.
- To enable pop-ups in Netscape, pull down the Netscape menu, choose Preferences, click Privacy & Security and PopupWindows, uncheck Block unrequested pop-up windows. Click OK.
What if the Museum Example and Library Example buttons or PDF files don't work?
- This course uses PDF files to display some content. If you do not have the Adobe Acrobat Reader® needed to view PDF files, click Get Acrobat Reader Free.
How do I open a second web browser window if I want to see the modules and my discussion forums at the same time?
- To open a new window in Internet Explorer for Windows, pull down the File menu, select New, choose Window. Your task bar will show the new window. Use the task bar to move between the windows.
- To open a new window in Internet Explorer for Mac, pull down the File menu, select New Window. Use the Window menu to move between windows.
- To open a new window in Firefox, pull down the File menu, select New Window. Use the Window menu to move between windows.
- To open a new window in Netscape, pull down the File menu, select New, the choose New Navigator Window. Use the Window menu to move between windows.
How do I expand the web browser window?
- To expand the web browser window in Windows, click the middle button in the upper right corner of the window.
- To expand the web browser window in Mac, click the green plus "+" button in the upper left corner of the window.
Is a text-only version of the modules available?
- A text-only version of the course is available through the Home page.